Details are provided in this section on setting up your Webhook Endpoint and listening for events via the Nuapay User Interface
Overview Setup
To set up Webhooks you will need to:
- Create an endpoint.
- Configure the Webhook(s) you require.
- Listen for events (see the Receiving Endpoint section for more on this).
Note that before you can use Webhooks you must set up a dedicated Endpoint on your infrastructure. (See Webhook Receiving Endpoint for more on this).
Setting up a Webhook
To set up a Webhook you must have Nuapay Console / Developer Dashboard access:
- Log on to the Nuapay Console.
- Click Webhooks from the left-hand menu and click Add Webhook.
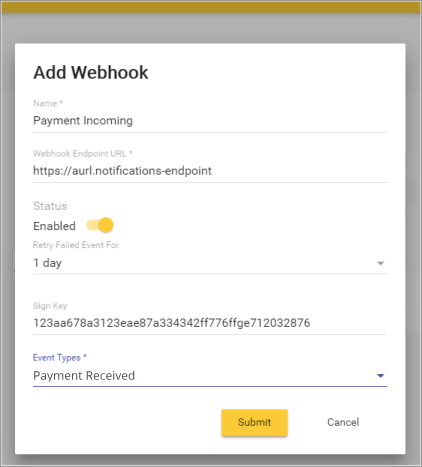
- Add the required details in the pop-up dialog box:
- Specify:
- The name of the Webhook notification.
- The URL of the Endpoint you configured.
- Status is set to Enabled by default (if Disabled no notifications are generated).
- Retry period (determines for how many days failed notifications will be retried. Retries are automatically generated every 30 minutes). In the screen above the setting is 1 day so retries will be made every 30 minutes for 24 hours (or until a retry is successful).
- Sign Key is the secret key that the application uses to sign the notification JSON body. The signature is sent in the request HTTP 'x-signature' header. If you leave this field blank the application will automatically generate a key.
- The Event Types drop-down allows you to configure what events will trigger the notification to the Webhooks Endpoint URL. In the example above only Payment Received will trigger a notification but you may define 1-n events as required.
- Click Submit.
Once you have set up the Webhook, you will need to configure a Receiving Endpoint.