Payment Initiation Service Provider Checkout Page implementation Options for Partners
Your PISP checkout page may be implemented in one of the following ways:
- CHECKOUT
- SELF_HOSTED
- SELF_HOSTED_CALLBACK
| Checkout | This mode lets you use the Nuapay user interface for Bank Selection. You process JavaScript events to determine when the payment flow is completed. |
| Self-Hosted | The user interface is handled by you, the merchant (or partner, acting on behalf of a merchant) for Bank Selection; callback handling is through the Nuapay TPP, you process the merchantPostAuth on your system when the payment flow is completed. |
| Self-Hosted-Callback | In this mode the user interface is handled by you, the merchant (or partner, acting on behalf of a merchant) and you manage the PSU’s experience after interacting with an ASPSP: the Callback bypasses the Nuapay TPP, you manage the callback URL that is required for each ASPSP interaction, upon receiving the callback you send the details back to Nuapay for processing. |
What is the Best Approach?
Each approach has its advantages and disadvantages - the table below summarises the different implementations
| Mode | Advantages | Disadvantages |
| Checkout | Easier implementation; No bespoke UI design (e.g. for the Bank Selection screen) is required; No TPP license is required. | No UI customisation is possible; “Powered by Nuapay” is displayed on the UI. |
| Self-Hosted | Full control over the user interface | Requires more development effort; Requires a call to the List Bank service; following the PSU’s interaction on the selected ASPSP, the Callback URL redirects the user to the Nuapay TPP. |
| Self-Hosted-Callback | Full control over the user interface and the Callback URL; it is possible to bypass the Nuapay TPP application | Requires additional development effort; Requires a call to the List Bank service; Registration of the callback URL (via Software Statement Assertions in the UK Open Banking scheme, for example) at each ASPSP is required. |
Checkout Mode
In Checkout mode (for Partners) you will:
- Use your partner-level API key to retrieve the list of your merchants and retrieve a token representing the required merchant.
- Call the
/paymentsendpoint on behalf of your merchant, using the OAuth token retrieved in the previous step (see Create Payment) and set theintegrationTypetoCHECKOUT. Manage the returned payment identifier with some Nuapay-provided JS and CSS to render the Bank Selection screen for your payers. - The PSU selects a bank.
- Redirect the PSU to the ASPSP to authorise the payment.
- Process the callback URL; display the status to the PSU and close the TPP UI, passing control to the parent window.
- Use Retrieve Payment to determine the final payment status, if required (an optional step).
A detailed overview of the various steps involved in this flow is provided in the image below.
Tip: Click Extend from the top menu to enlarge or click the image itself to open it in a new browser tab/window
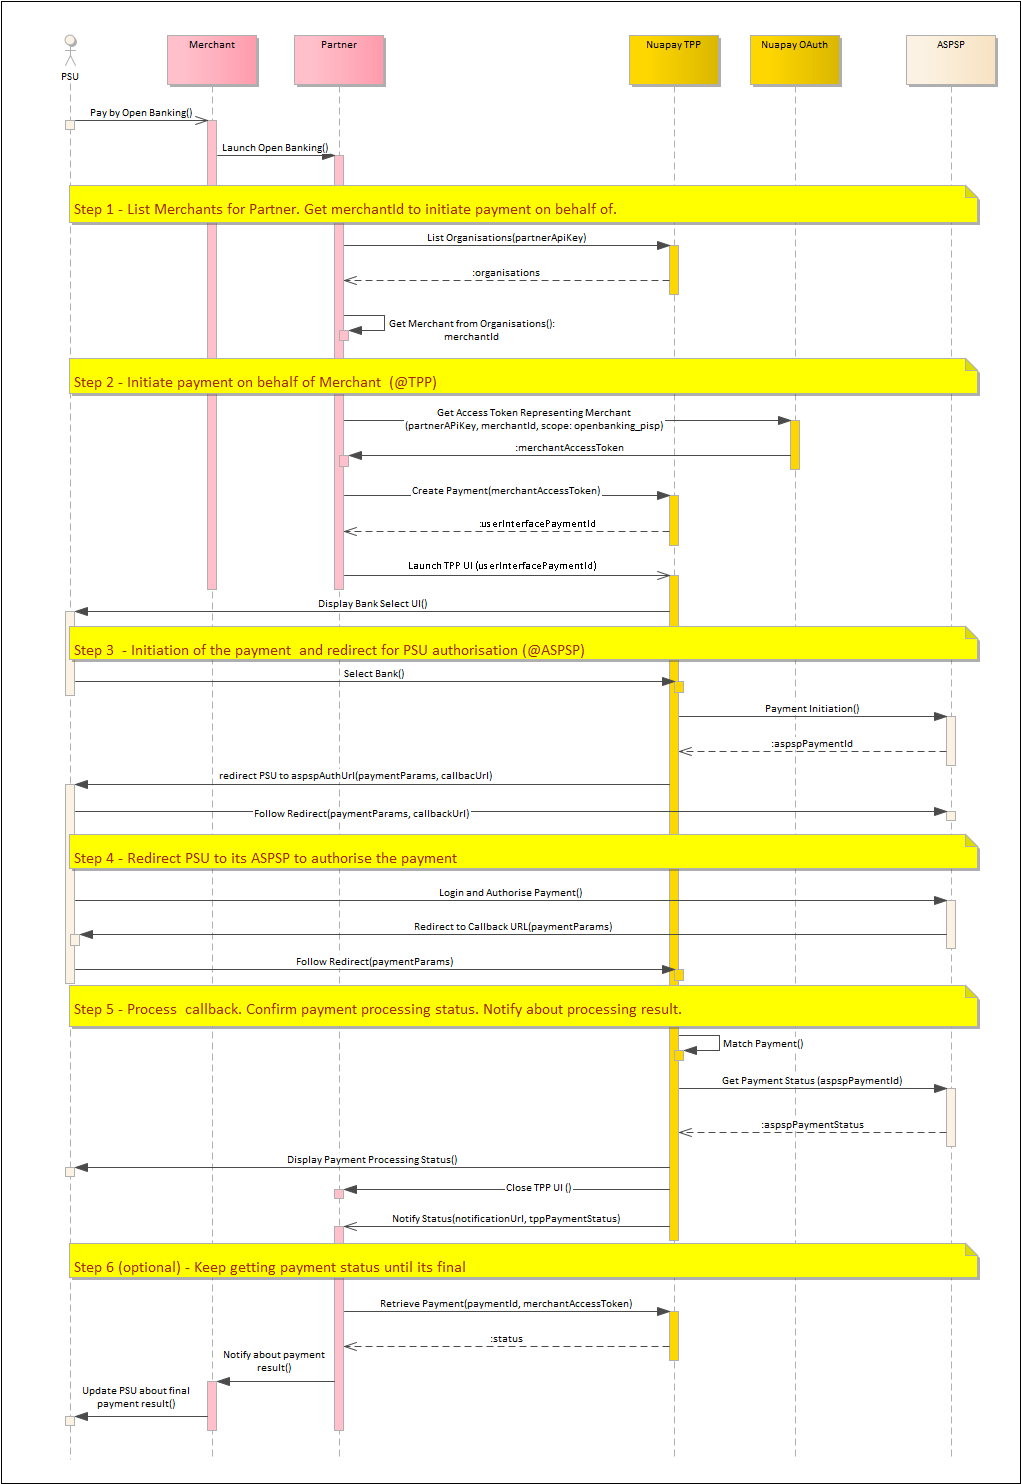
For more on this see Checkout Payment Page Setup.
Self-Hosted Mode
In Self-Hosted mode (for Partners):
- Use your partner-level API key to retrieve the list of your merchants and retrieve a token representing the required merchant.
- You will design your own Bank Selection screen; use Retrieve Banks to populate your interface.
- Once the payer has selected a bank, call the
/paymentsendpoint using the OAUth token, representing the required merchant, (see Create Payment). Set theintegrationTypetoSELF_HOSTED, specify thebankIdprovided by the payer and set themerchantPostAuthUrl. - Redirect the PSU to the ASPSP to authorise the payment. The
callbackUrlis hard-coded for the Nuapay TPP. - Process the callback URL to the configured merchantPostAuthUrl.
- Use Retrieve Payment to determine the final payment status, if required (an optional step).
A detailed overview of the various steps involved in this flow is provided in the image below.
Tip: Click Extend from the top menu to enlarge or click the image itself to open it in a new browser tab/window

For more on this see Self-Hosted Payment Page Setup
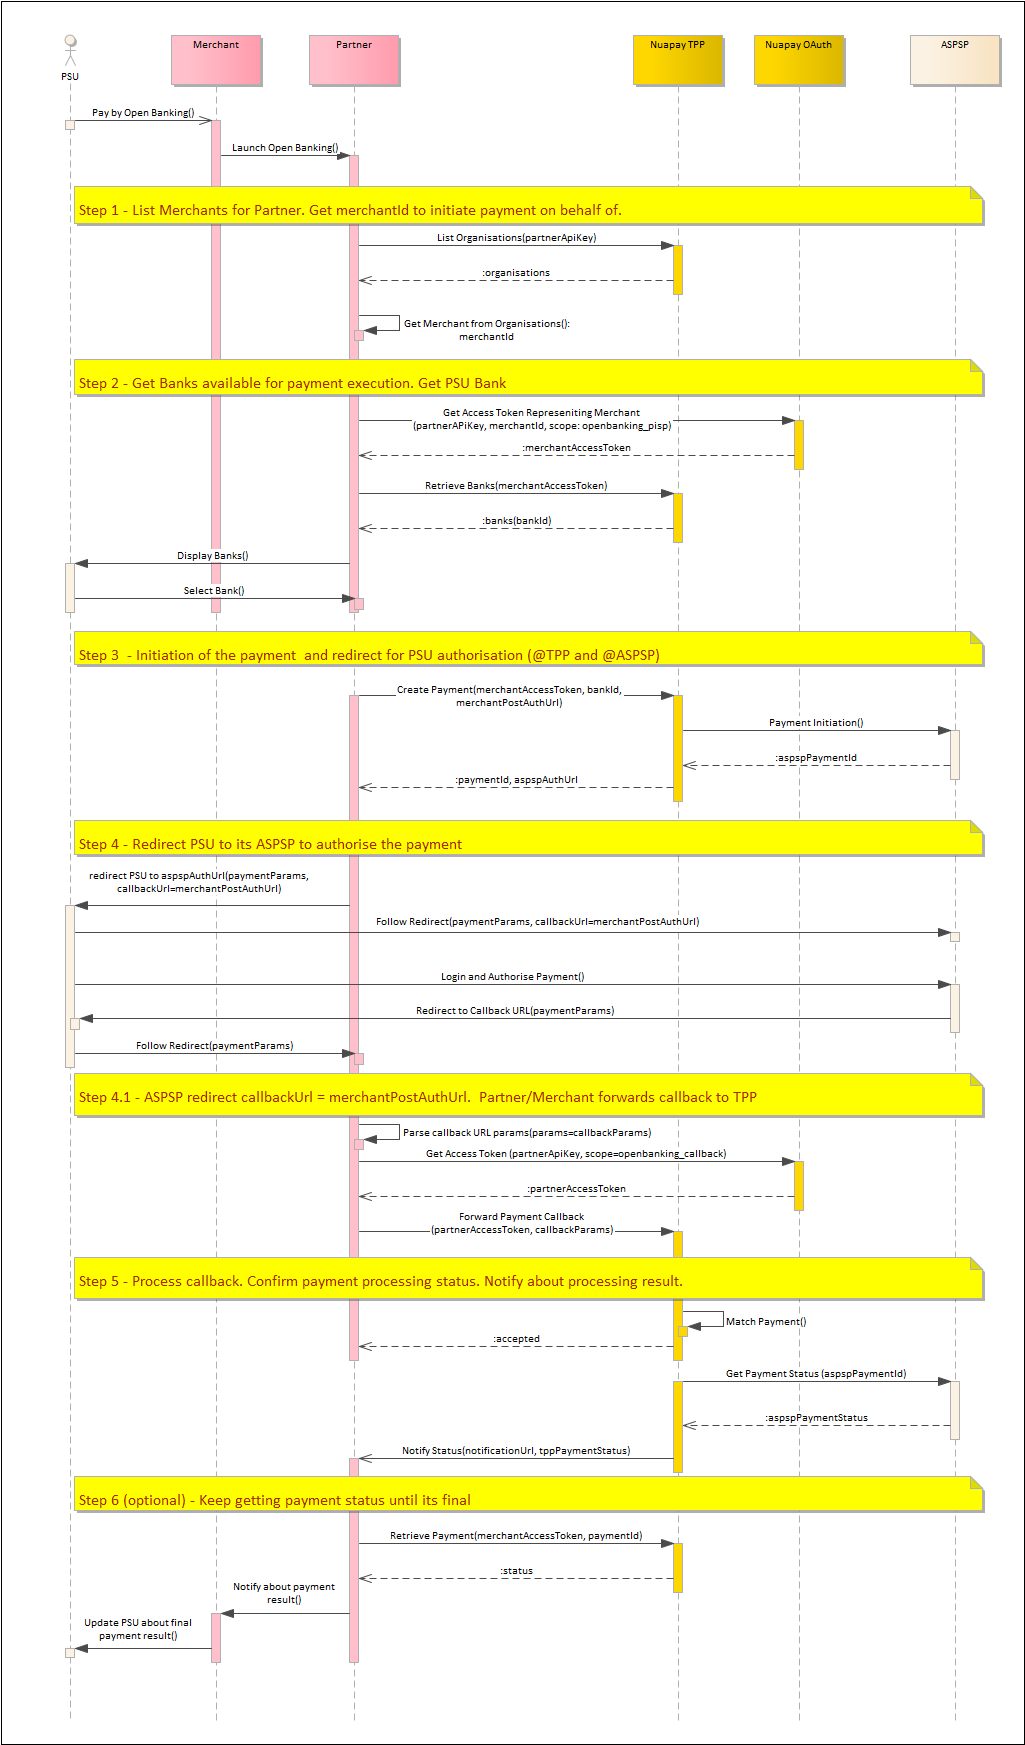
Self-Hosted-Callback Mode
Warning: SELF_HOSTED_CALLBACK mode is currently only available in the Nuapay Test environment.
Note: If you want to use this mode you must have first registered your OAuth 2.0 Callback Handler with the platform. Your Account Manager can provide you with more information on this.
In Self-Hosted-Callback mode:
- Using your partner-level API key retrieve the list of your merchants and retrieve a token representing the required merchant.
- You will design your own Bank Selection screen; use Retrieve Banks to populate your interface.
- Once the payer has selected a bank, call the
/paymentsendpoint using the OAUth token, representing the required merchant, (see Create Payment). Set theintegrationTypetoSELF_HOSTED_CALLBACK, specify thebankIdprovided by the payer and set themerchantPostAuthUrl. - Redirect the PSU to the ASPSP to authorise the payment - note that in this mode the
callbackUrl= themerchantPostAuthUrl.- Unlike in the SELF_HOSTED mode, the OAuth callback from the bank is not passed to the Nuapay TPP directly, instead it is directed to the merchantPostAuthUrl.
- The partner retrieves An OAuth token.
- The payment callback is passed to the Nuapay TPP.
- Process the callback and confirm the payment status.
- Use Retrieve Payment to determine the final payment status, if required (an optional step).
A detailed overview of the various steps involved in this flow is provided in the image below.
Tip: Click Extend from the top menu to enlarge or click the image itself to open it in a new browser tab/window