Overview
To add Open Banking to your payment page you will need to carry out the following steps:
- Retrieve your API Key - contact our Client Support team if you do not have a key.
- Generate a unique Payment ID.
- Include a reference to a CSS and JS file on your payment page.
- Add a button to your page.
- Add a JavaScript Event Listener to detect when the payment UI pop-up window closes.
Authorisation
An API Key or OAuth token uniquely identifies you on Nuapay and is required to allow you to use our API services.
For more on API Keys and OAuth, see the API Basics section.
Generating a Unique Payment ID
Each Open Banking payment requires a unique payment identifier.
To generate a payment ID:
- Generate a server-to-server call to
/payments. - Ensure that you have referenced your API Key or OAuth token in the request.
- The
/paymentsservice is described in Create Payment.
Adding the CSS and JS File References
On your payment page you will need to add the following:
For Sandbox
<script src="https://sandbox.nuapay.com/tpp-ui/js/nuapay-open-banking.js"></script>
<link rel="stylesheet" type="text/css" href="https://sandbox.nuapay.com/tpp-ui/css/nuapay-open-banking.css" />
For Production
<script src="https://api.nuapay.com/tpp-ui/js/nuapay-open-banking.js"></script>
<link rel="stylesheet" type="text/css" href="https://api.nuapay.com/tpp-ui/css/nuapay-open-banking.css" />
Adding The Open Banking Pay Button
At this point you have:
- Added the JS and CSS links to your payment page.
- Retrieved the payment ID (via the Create Payment service).
To enable the PAY button you will need to add an onclick event. See the example below:
<a class="btn btn-primary" href="#" onclick="NuapayOpenBanking.showUI(‘gabxrlvbl5’;‘https://sandbox.nuapay.com/tpp-ui/’);">Pay Now</a>
This button will open the Select Banks pop-up for the Payment ID gabxrlvbl5
https://sandbox.nuapay.com/tpp-ui/ is the location of the Nuapay TPP User Interface, which will allow your customers to select their bank.
1. Click a button to pay by Open Banking (allowing you to retrieve the paymentId)
2. Click a second button to choose a bank (launching the pop-up with the paymentId retrieved in step 1)
Because launching the Select Bank screen in step 2 is a user-initiated action, your users will not be prompted to enable pop-ups.
Note that there is a Sandbox and Production TPP for this so you will need to specify the correct URL based on whether you are testing or working in Production:
| SANDBOX | https://sandbox.nuapay.com/tpp-ui/ |
| PRODUCTION | https://api.nuapay.com/tpp-ui/ |
Adding a Listener
Once you have successfully added the PAY button to your site you will next need to handle when the pop-up window is closed. In a successful flow:
- The pop-up will be closed by users after they confirm the payment with their bank and are redirected to your confirmation message.
- Users may also choose to cancel out of the flow at any point and close the pop-up window without completing the payment.
To manage the closing of the pop-up window, you will need to add a Listener to your parent Payment Page window to listen for the close event, which (for Payment ID gabxrlvbl5) would look like this:
{"status":"CLOSED","paymentId":" gabxrlvbl5"}
A Sample Listener is provided below.
<script>

var listener = function(event) {
    if(event.data.status=="CLOSED") {
        var url = "/merchant/status?id=" + event.data.paymentId;
        $.ajax({
          url: url,
          success: function(data){
            if (data.status == "COMPLETE") {
                location.replace("./shoppaid");
            } else {
                location.replace("./shopfailed");
            }
          },
          error: function(){
            location.replace("./error");
          }
        });
    }
}

window.addEventListener("message",listener,false);

</script>
Here we are checking that the event is a closed event, in this example the merchant is calling back to their own server.
The call is to /merchant/status?id=gabxrlvbl5
The End-User Experience
Once configured your users’ interaction with Open Banking payments will be similar to the following:
The PSU (i.e. the end user) will select the required goods or services on your merchant site and:
- Select Nuapay Open Banking as the payment method.
- Click Pay.
- A pop-up window overlayed on the calling payment page is generated. This is rendered through Nuapay’s TPP application:

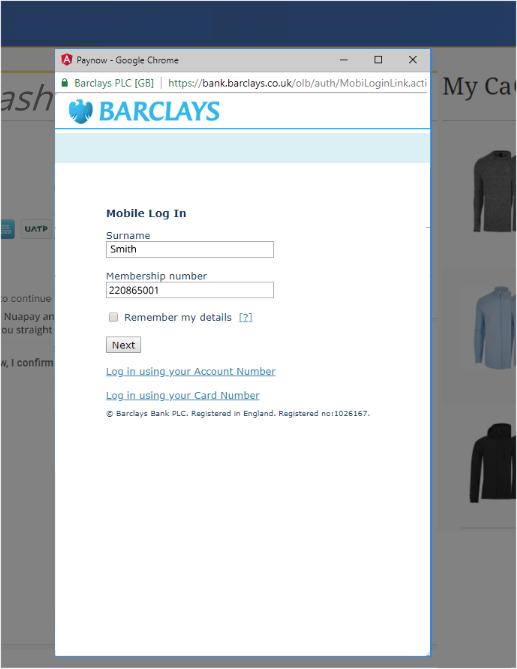
- The user selects the ASPSP (i.e. the bank) in which his account is held (Barclays for example) and clicks Continue.
- A confirmation of the bank selected is displayed and the user clicks Confirm.
- The user is then redirected to his bank where he must sign on with his online banking credentials:
- Once successfully signed on the user can choose to Confirm the payment to the merchant:

- The payment is authorised and the payer (PSU) is redirected to the Nuapay TPP with a confirmation message:
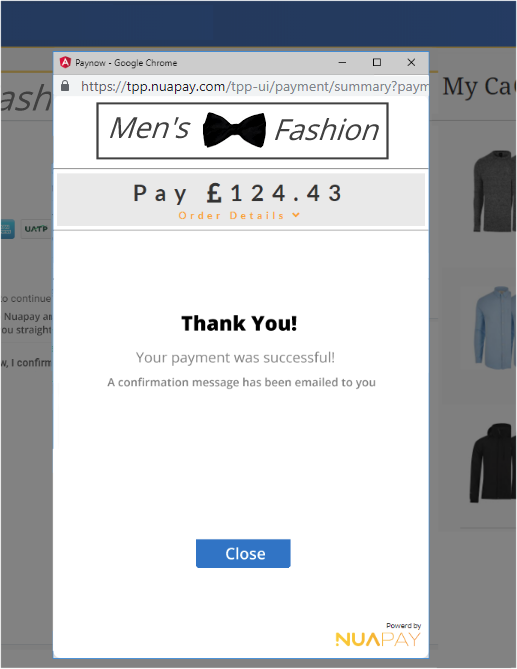
- The pop-up window may be closed by the payer (or may close automatically) and the user is redirected to the merchant payment page, with a confirmation message.