Overview
A detailed overview of the various steps involved in the REDIRECT flow is provided in the image below.
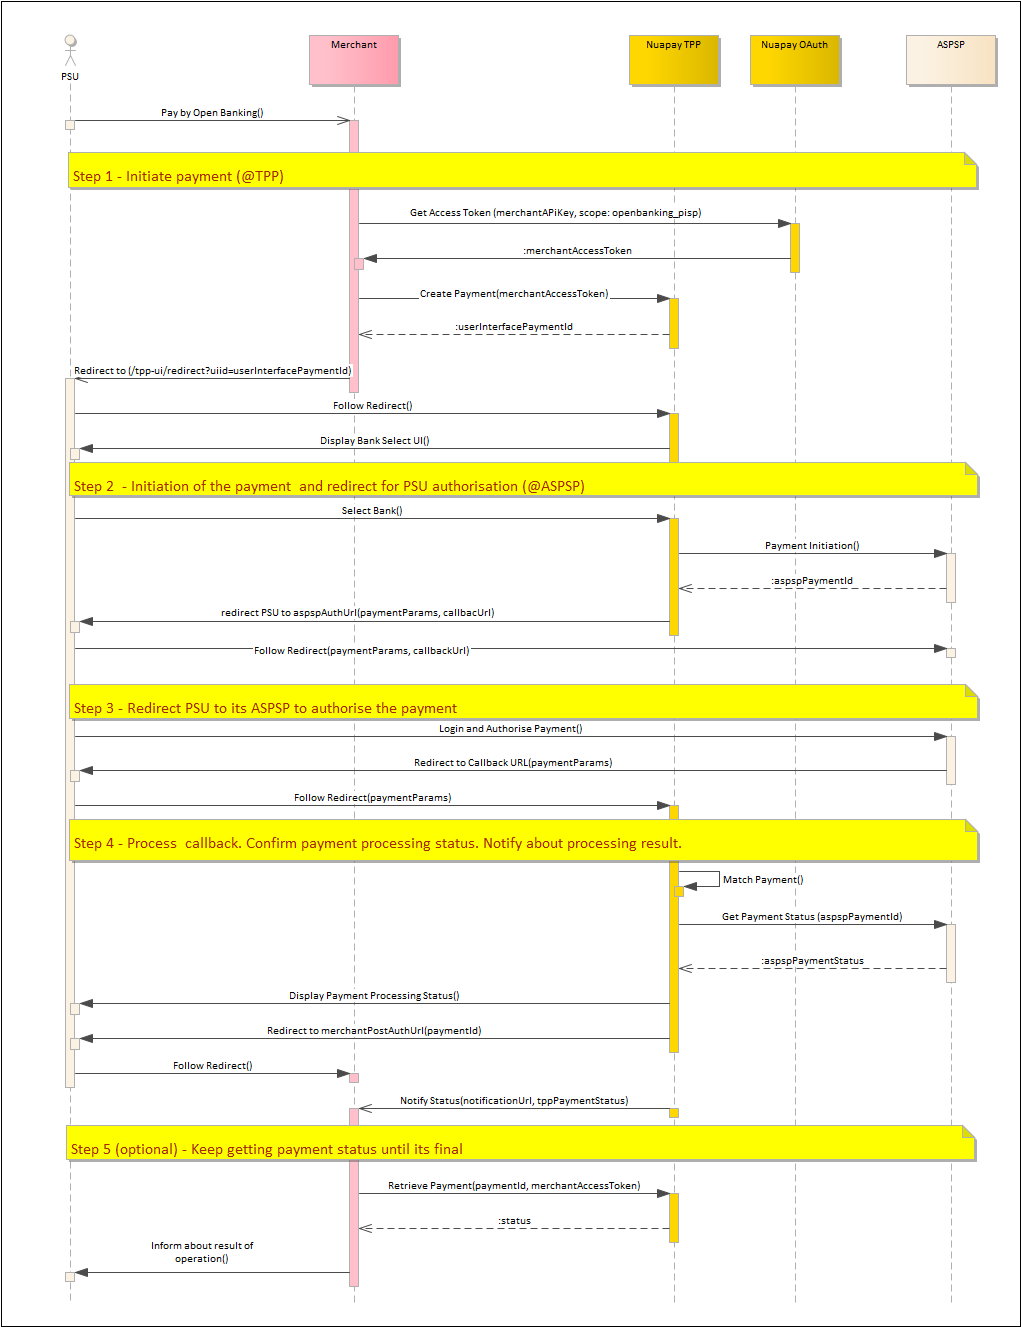
In Redirect mode you will:
- (Optionally) Use your API key to retrieve a merchant access token. (For more on this see retrieving tokens).
- Call the
/paymentsendpoint (see Create Payment), using the OAuth token retrieved in the previous step (or else use your API Key). - Set the
integrationTypetoREDIRECT. You must also provide themerchantPostAuthUrl- this is mandatory for the Redirect flow. - The Nuapay TPP creates the payment object and returns the
userInterfacePaymentId. - The PSU then needs to be redirected to the URI with the
userInterfacePaymentId. You must build a URI that can be used on a web page or sent by an e-mail to the end user. The URL will be similar to the following (on the Production environment):https://api.nuapay.com/tpp-ui/redirect?userInterfacePaymentId=<userInterfacePaymentId>
- The end user clicks the URI and the Nuapay TPP (with the Bank selection window) is displayed in a new browser window.
- When the user selects a bank he/she is redirected to the selected ASPSP to authorise the payment.
- The ASPSP redirects the PSU back to the TPP UI which processes that callback.
- The TPP then redirects the PSU to the
merchantPostAuthUrlwith the parametersuserInterfacePaymentId. - Use Retrieve Payment to determine the final payment status, if required (This integration also supports webhooks so you can be informed when the payment is completed).
Authorisation
An API Key or an OAuth token uniquely identifies you on Nuapay and is required to allow you to use our API services.
For more on API Keys and OAuth, see the API Basics section.
Calling the Payment Endpoint
The Open Banking payment endpoint returns a payment identifier on a successful invocation.
To generate a payment ID:
- Generate a server-to-server call to
/payments. - Ensure that you have referenced your API Key or OAuth token in the request.
- The
/paymentsservice is described in Create Payment.
Adding the CSS and JS File References
On your payment page you will need to add the following:
For Sandbox
<script src="https://sandbox.nuapay.com/tpp-ui/js/nuapay-open-banking.js"></script>
For Production
<script src="https://api.nuapay.com/tpp-ui/js/nuapay-open-banking.js"></script>
Adding The Open Banking Pay Button
At this point you have:
- Added the JS and CSS links to your payment page.
- Retrieved the payment ID (via the Create Payment service).
To enable the PAY button you will need to add an onclick event. See the example below:
<a class="btn btn-primary" href="#" onclick="NuapayOpenBanking.redirect(uiid, tppUibaseUrl);">Pay Now</a>
This button will open the Select Banks on a new browser tab or window for the userInterfacePaymentId (the uiid).
Reusing the Link
If you have decided to email the link to the PSU or have provided a QR code, that user may begin the payment, drop out at some point without completing the payment and retry accessing the link later. In that case:
- Where a link is accessed, the TPP will check the existing payment status in the TPP database.
- If the payment’s current status means that the payment cannot proceed (e.g. if the payment is in
SETTLEMENT_REJECTED) an alert is displayed to the user on the TPP and he/she cannot continue. - If the payment is in status
PENDINGthen the user will be able to proceed and complete the payment. Note thatPENDINGis the only status that will allow the PSU to proceed.
PENDING, allowing the user to complete the payment, if required.